Using VirtualGlobalPhone with Twilio
We believe setting up business communications should be a straightforward, painless process. That’s why we build our SIP services to play well with whichever communications platform you might use – whether it’s hardware based or hosted in the cloud, built internally or bought from a third-party vendor. Why is this better than paying for a bundled service from one provider? Because it allows you to benefit from VirtualGlobalPhone’s fully compliant, reliable voice infrastructure and the improved connectivity and scalability of our network while continuing to use your existing apps. It’s a win-win for you!
The following guide will show you how to bring your VirtualGlobalPhone numbers to Twilio. It’s easy to connect numbers from your VirtualGlobalPhone account to Twilio’s platform.
What you’ll need to get started:
1. A registered VirtualGlobalPhone account with assigned numbers. (Create your account here)
2. A registered account with Twilio (Create it here)
Note: On both platforms, a free-trial account is also enough to get started!
HOW IT WORKS
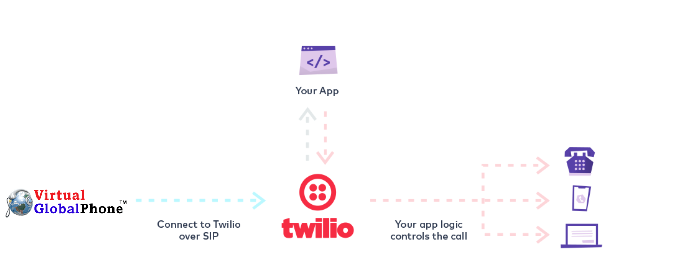
To connect your VirtualGlobalPhone numbers to Twilio’s platform, we need to establish a SIP interface between our platform and theirs. This can be done in four steps:
1. Create ACLs (Access List) to allow signalling between VirtualGlobalPhone and Twilio
2. Create a SIP interface between Twilio and VirtualGlobalPhone
3. Create a voice URI to test the interface
4. Assign a voice URI to a VirtualGlobalPhone and place a call
Create ACLs (Access List) to allow signalling between VirtualGlobalPhone and Twilio
First, we need to white list VirtualGlobalPhone’s IPs from the Twilio side for your apps.
1. Log in to your Twilio account
2. In the dashboard, go to Programmable Voice > SIP Domains > IP Address Control Lists or, if you’re already logged in, click here to go there directly
3. Create a new ACL by clicking the “+” sign. You can use “VirtualGlobalPhone” as the friendly name for this ACL. As the pop-up only allows you to enter one IP, which is 151.106.10.6 , 134.119.223.134
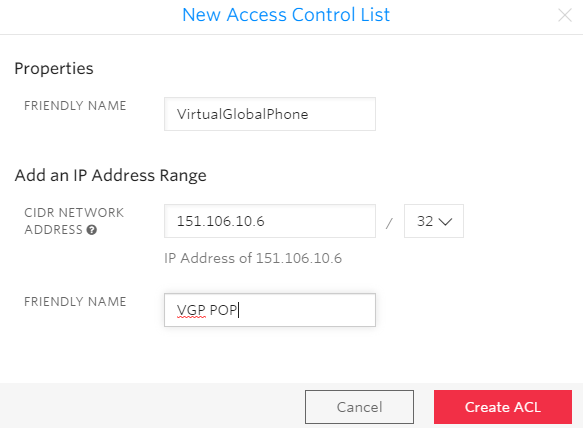
4. When you’re done adding all the PoP addresses, your ACL should look something like this:
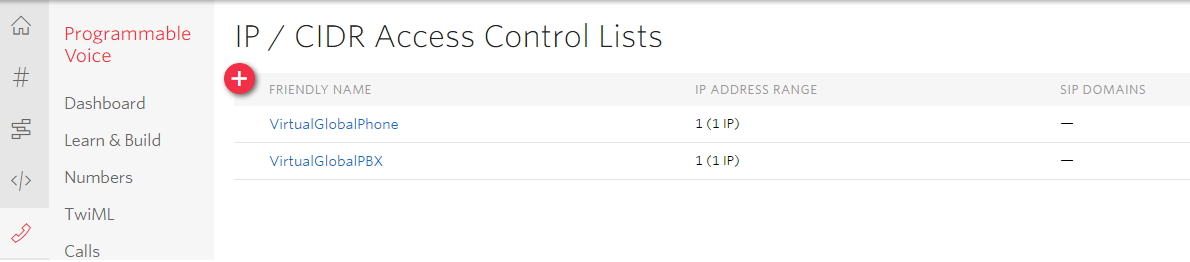
5. All done! Now we can create an SIP interface and link this ACL to it!
Creating a SIP interface between Twilio and VirtualGlobalPhone
Next, we’ll define the path/domain by which we can access Twilio apps from VirtualGlobalPhone.
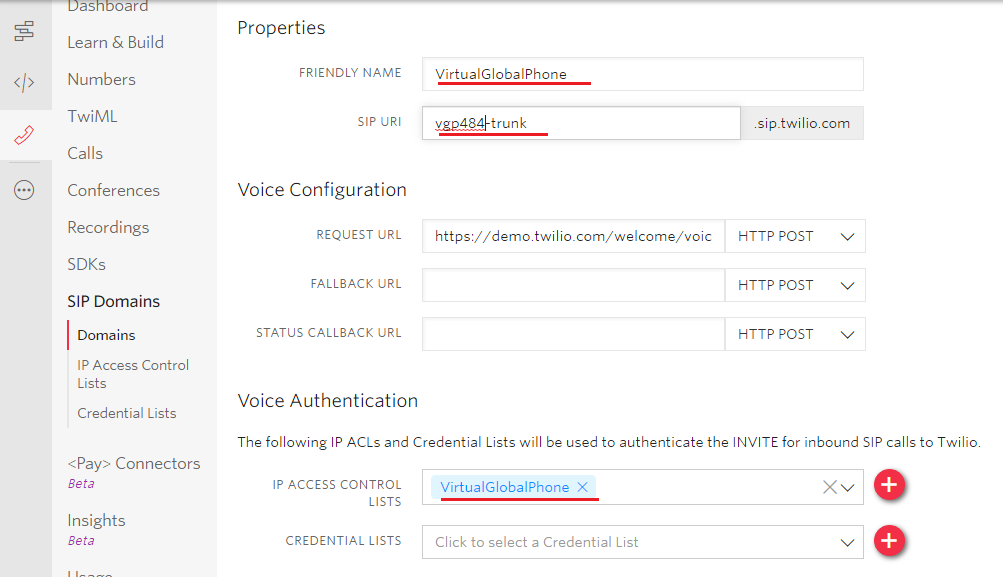
1. In the Twilio dashboard, go to Programmable Voice > SIP Domains > Domains, or click here and then click “+” to create a new SIP Domain.
2. Specify your new SIP domain. Note what you created, as this will be needed in the next step. This is the domain of your SIP URI. We are using “vgp484-trunk.sip.twilio.com” for this tutorial. That makes my Voice URI for VirtualGlobalPhone: anything@vgp484-trunk.sip.twilio.com
[vgp484 means – VirtualGlobalPhone and last 3 numbers of your allocated phone]
3. Finally, add your ACL under the “Voice Authentication” section in the drop-down list. When you’re done, your SIP interface should look something like this:
Creating a Voice URI between VirtualGlobalPhone and Twilio
This entire complex configuration from our end will be handled by our technical team without any cost. Just send us the SIP domain you created at twilio by writing it to email to care@virtualglobalphone.com from your registered email so your Relationship Manager will co-ordinate and get it done.